5095
5095
Before you can use Ticklers in your loan, you will need tickler templates set up. Ventures includes a variety of tickler templates. They are known as system templates. You can use one of the provided system templates, or you can create your own.
To create a Tickler Template:
- Mouse over Documents in the menu at the top of the screen.
- Click on Ticklers in the sub options that appear.
- On the Ticklers page, click on Templates in the menu on the left.
You can choose to create a new template from scratch, or you can choose to copy a pre-existing template (whether it is one you built or a system template) and build on it. You cannot modify system templates directly. You cannot delete a system template.
To copy a template:
- Click the Copy icon next to the template you want to copy. The copy icon looks like two pages with bent corners stacked one in front of the other.
- When you click copy, the system will generate a copy of the template, you will see it listed in the table directly underneath the template you copied it from. It will be listed as the name of the template you copied, with the word (Copied) appended to it. Click the name of the template to make edits to it. We will cover how to make edits to the template a little later in this article.

To create a template from scratch:
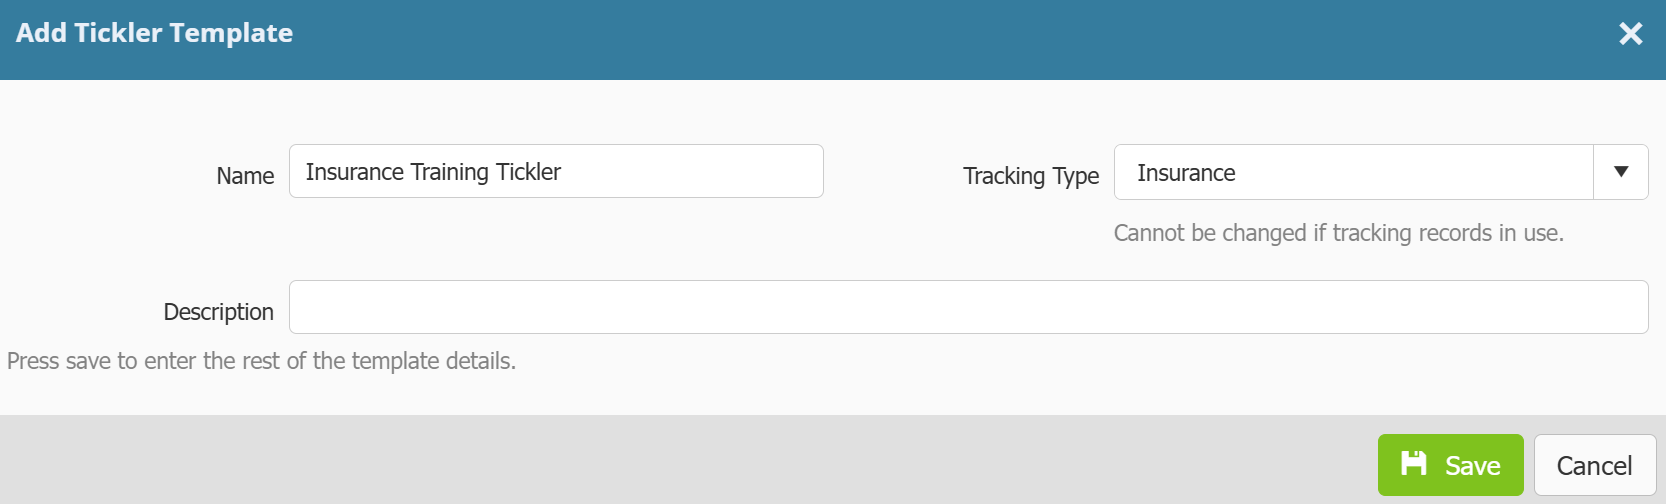
- Click the Add button ( as seen above).
- The Add Tickler Template pop up will appear.
- Go through and fill in the fields:
- Name: Name your tickler, this is the name that will appear in dropdown menus when the tickler is being selected. Try and be as descriptive as possible.
- Tracking Type: Select what this tickler is being set up to track. You can choose: County UCC, Financials/Tax Returns, Insurance, Job Tracking, Loan Dates (selecting Loan Dates will add an extra field to specify which date to track), State UCC and None.
- Description: You can use this field to enter a brief description of the template. This is optional and not visible when selecting a template for use.
- Click Save
The pop up will update.
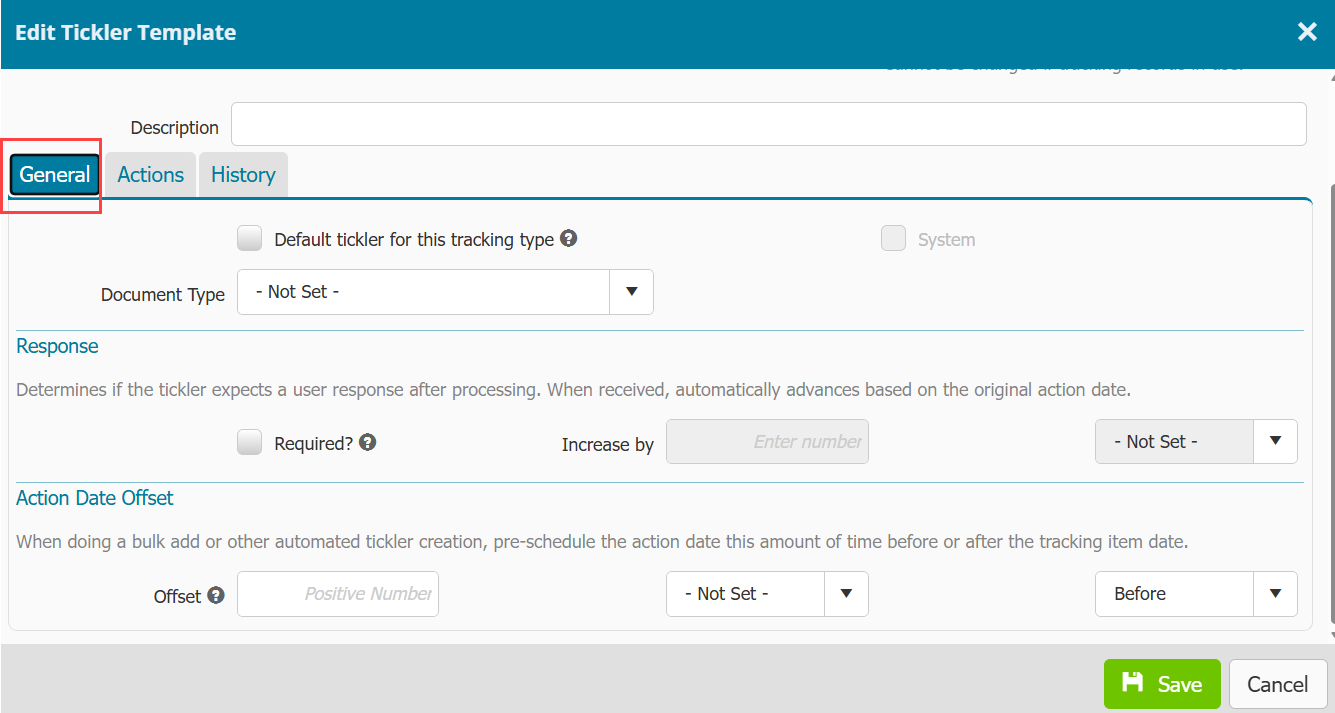
- Go through and fill in the fields:
- Default tickler for this tracking type: If you check this box, the template you are creating will be set as the default template for the tracking type. For example if you set the tracking type to Insurance, and set the template to be the default, when a tickler is added to a loan to track Insurance, it will default to select this template. Users can still select another template when creating the tickler in the Tracking -> Tickler menu, but it will default to whichever is set as the default for the tracking type if entered on the Tracking -> Insurance menu.
- Document: This will pull a list of all document types in your system. You can select a specific document type from said list. When you are processing the tickler in a loan, you will be given the option to add a document to the response. This document will be assigned the document type selected here and added to the loans document storage area. We do not recommend setting a document type if you are making a default template.
- Response: Check the "Required?" box if the Tickler will require a response from the client (for example they may need to send you updated financials or insurance information). When this option is checked the "Increase by" field will unlock. Use the field that says "Not Set" to select whether you want to set the "Increase by" field to correspond to Days, Months, or Years. Then use the field labeled "Increase by" to set the corresponding amount. These fields allow you to set ticklers to automatically update with a new notification date upon receipt of the information you are waiting for. For example every year you may require your clients to submit insurance information. By setting the Increase by Years field to 1, when a response is added to the Tickler indicating the information was received, the Tickler will automatically update with a new due date that is one year away. This saves you having to manually enter a new date every time a tickler is processed.

- Action Date Offset: These fields allow you to schedule a Tickler in advance of the Tracking date it is linked to. For example, if you want to take action three months before the Insurance expires, you can use the Offset field to enter 3, and select Months in the field labeled "Not Set" and select "Months" in field nest to the Action Offset field. In the last field in the section, choose whether you want the Action Date offset to be before, or after the Expiry date. In this example the tickler will look at our Insurance expiry date, and change from Not Due, to Due 3 months before the Insurance expiry date.

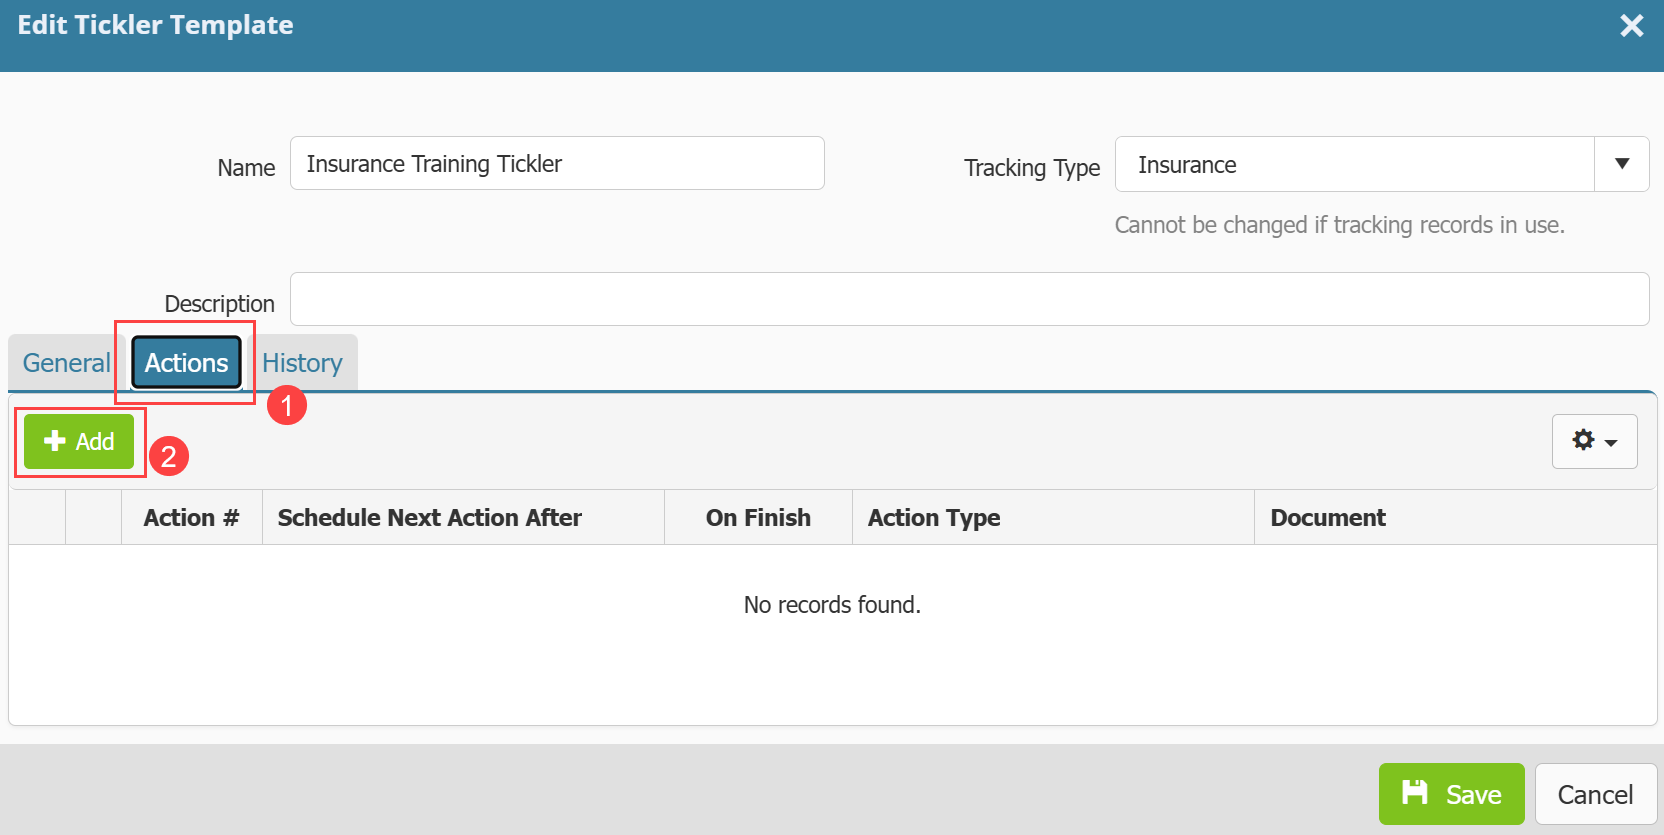
- You are not finished yet. Now you have to assign actions to the Tickler.
- Click the Actions tab
- To add a new action click Add. We will proceed with adding a new action
The Add/Edit action pop up will appear. Go through and fill out the fields:
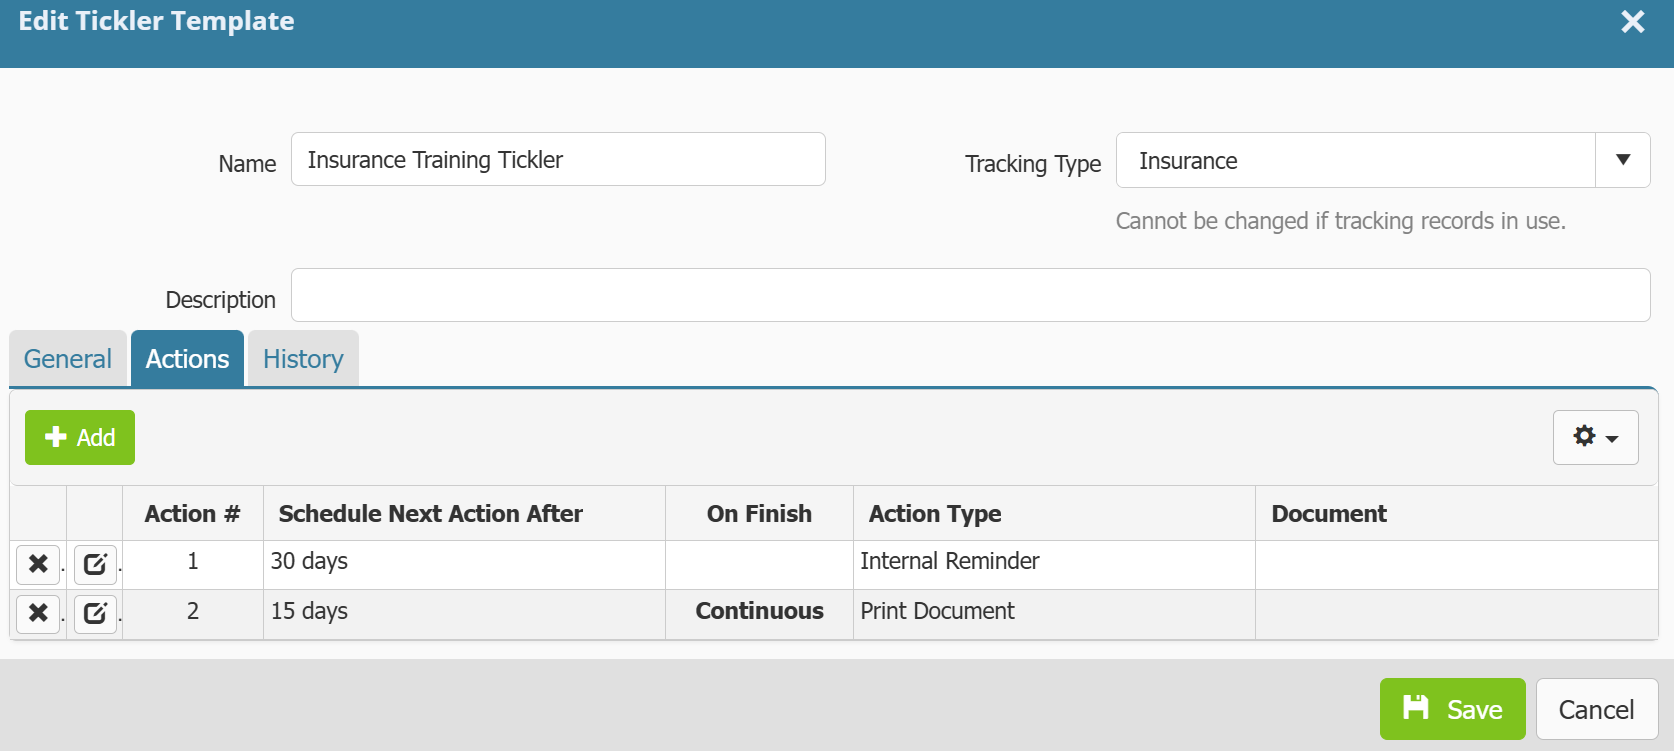
- Action #: This dictates the order the Actions will occur. It automatically defaults to the next unused step. Changes here will affect other actions, for example if there is already an action labeled as 1, and you set an action you are creating as 1, it will replace the action labeled as 1 and said action will be moved to action 2. If there is an action labeled 2, that will become action 3 and so on.
- Mark Complete when Processed: If this box is checked, the Tickler will become inactive upon executing the action. It will no longer track the item.
- Schedule Next Action After: The values in the fields in the Schedule Next Action After section allow you to determine when the Tickler should be Due again when it is in the current action. For example, you are waiting for update insurance information from a borrower, if they do not provide this to you within 30 days, you want to be reminded to send a second request for the information. To accomplish this, you can set the first action to have a value of 30 days under the Schedule Next Action After section. This will tell Ventures that after 30 days of not receiving the updated information to remind the user to request them again, or send an email, or schedule a phone call depending on the action set.
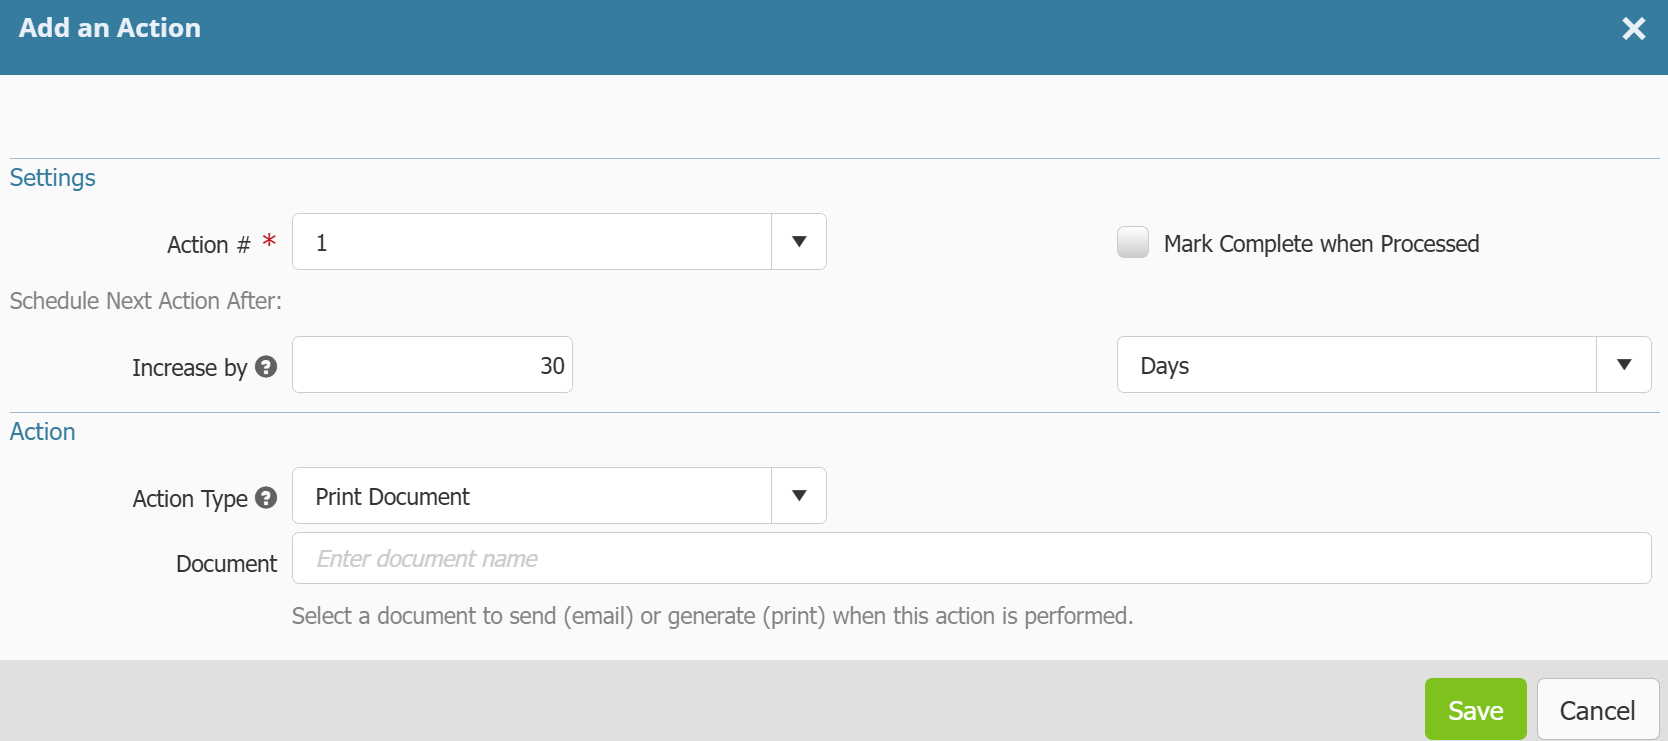
- Action Type: The Action dictates what kind of reminders or Actions the tickler will provide based on the dates set up. Based on your selection in the Action field, there may be further options to set:
- Internal Reminder: This is a simple reminder. When you select it as an action you will be provided a space where you can enter any comments to display with said reminder. (As seen in the screenshot above)
- Print Document: This option will allow you to select a document from your web templates and print it. The document will print for you to send by fax or mail.

- Phone Call: This option will indicate that a phone call is needed to contact the client and resolve the tickler. You will be able to choose a contact to call from an additional dropdown menu if you select this option.

- Email: Selecting email will allow you to select a document from you web templates to attach to the email, specific who the primary email recipient should be, enter a subject and body for the email, and you have the option to Append the Ventures Log Number to your subject. This will include the Ventures log number in your subject line automatically. You can set how the email service should handle errors in the Handle Errors tab. After you save the action, you can reopen it and add additional contact in the "More Contacts" tab.
- Email or Print: This option will first email all contacts that have an email address and then will print copies of the document for any contacts that do not have an address listed. You will see the same options as selecting just the "Email" option described above.
- Note: if using the Email function or the Email or Print function, a Note will be recorded within the loan Notes area recording the emails that have been sent.
- Note: The 'primary' EPC or POC contact selection follows a progression to determine who to select on loan records. If there is a tie between two criteria it goes to the next one in the list below:
- Largest percentage owned
- Is Controlling member
- Is Guarantor
- Is Director
- Is Officer
- Is Key Employee
- If is is still a tie between contacts, it takes the owner that was added to the system first

- When you have finished building your Action, click Save. You will return to the Edit Tickler Template and you should see the Action you have created in the list of Actions in the template.
- Now go through and enter as many actions as you need to. You can have as many actions as you want, you must have at least one action.
- To delete an Action, click the X next to the row for the Action you want to delete. In the confirmation pop up that appears click delete. You will not see the X icon if there is only one action listed for the template as templates must have at least one action associated with them. Enter a second action and the X icons will appear.


Once you finish building your template click save.
The pop up will disappear and you will return to the Tickler Template table. Your template is now ready for use.