2537
2537
This article is also available as a video:
Looking for a specific instructions or a specific section? Use the table of contents below to jump right to it!
- Identifying which form to edit
- Creating a Form from an already Existing Form
- Buttons and Icons
- Navigating the Form
- Adding a new Tab
- Adding a new Step
- Adding a new Field
Please click here to return to the Gateway Administrator hub page.
Identifying which form to edit
Application form editing can be done by Lender Admin users in the Site Settings > Application Settings menu. There are several forms a user can update depending on what needs to be edited. The different form types are:
- Primary Application form - This is the part of the application that will be completed by every Primary Applicant, regardless of product type. The Primary Applicant is the individual that was invited to fill out an application by the Lender or the individual that started the application via the landing/prequal page.
- Additional Contact form - This form is used by any additional owner(s)/applicant(s) added to the application, in the ownership grid marked as a guarantor, before the Primary Applicant submitted their data portion of the application. This form will be filled out by every additional owner(s)/applicant(s) marked as a guarantor, regardless of product type.
- Product forms
- Application Questions (Optional) - Each product can have questions listed at the end of the Primary Application form that are product specific. This part of the application will be completed by every Primary Applicant with assigned Product, if used.
- Contact Questions (Optional) - Each product can have questions listed that are product specific for each applicant, at the end of the Primary Application and Additional Contact form, in the application. This part of the application will be completed by every Primary Applicant and additional owners/applicant(s) with assigned Product, if used.

After selecting a form type by clicking on the appropriate tab. You will see a list of versions. The current version will have the word "Current" next to it in the Current column. If a draft of a newer version exists it will appear above the current version with the word "Draft" in the Draft? column.
- To edit, click the hyperlinked version number of the form you would like to edit.

Creating a form from an already existing form
If you have already built a form, and you want to build another using your initial form as a blue print. You can copy your initial form and build upon it. The initial form will not be changed.
- After choosing the correct form type: Primary or Additional, click the Create New Version button located under the table listing the versions of the form.

- The create new version pop up will appear. In the pop up use the drop down menu to select the definition of the form you are creating. The definition is the product you would like this application to cover.
- Once you choose the definition, the version dropdown menu will appear. Choose the version you would like to copy and click OK.


When you click OK, the pop up will disappear and your new form will load. If you selected a previous version to base your new form on, you will see the copied layout ready for you to modify.


The layout of the buttons at the top of the form builder has changed.
- We'll start with the two icons first. If you see a check mark next to Designer Data and Ventures Fields, it means that Gateway and Ventures are synced. Gateway was able to successfully pull in the list of current available Ventures fields.
- The Save button becomes enabled when you have made changes to your form. When you make changes, you will see a little note appear above the buttons and icons indicating how many unsaved changes you have in the form. When you make changes the Validate and Publish buttons will be disabled. Once you click Save and your changes are saved, the Validate and Publish buttons will be enabled, and the unsaved changes count will disappear.


- The Validate button ensures that you have all the mandatory fields Ventures needs to create a record. When your application moves to Ventures, there are certain required fields Ventures needs to create a record. The validate button ensures your form includes fields that correspond to all the required fields in Ventures, ensuring a smooth handover between the two.
- Once you have Validated your form successfully, the Publish button will be enabled. When you are ready to publish your form click it. This will replace your current form with the form you just created. ***Note: After making updates and publishing the application form(s), any NEW applications created will have the change. Any application created before the update will have the previous version.***
- The Delete button allows you to delete your form. When you click it you will see a confirmation window pop up asking if you are sure you want to delete the version. Click Delete to continue and delete the form you were on.

- The Preview button allows you to see a preview of the form from the perspective of an applicant filling it out. Remember to preview your form before publishing it!

We have changed the layout of the form builder. It used to scroll across from left to right. Now it is vertical so you scroll up and down. We have also reorganized the builder to make it easier to navigate and build within. You now see your form laid out, by the tabs of the form. Click on a tab to see the steps within. Click on a step to see the fields within. In the example below, we can see the form has five tabs. If we look at a preview of the form, we can see the five tabs.


Click on the downward facing arrow in a tab to see the steps contained within. For example we can see that the Business Info tab has three steps and twenty four fields. If I click the downwards facing arrow in the tab, I can see details about each of the three steps contained within and how the fields are spread between them. Click the up arrow to collapse the tab.


Click the downward facing arrow in a step to see the fields within it. Notice you can see extra information in the fields without using the edit function. You can now see if the field is marked mandatory and any help text added to the field.


- To add a new tab to a form click the Add Tab button at the bottom of the form builder. The tab will appear. Click the edit button to edit the name of the tab.


- Click the downward facing arrow in the tab you want to add the step to.
- Click Add Step. The create a step pop up will appear. Fill it in and click ok.


- Click the downward facing arrow in tab you want to add the field to.
- Click the downward facing arrow in the step you want to add the field to.
- Click Add Field. Make sure you fill in the "Choose Ventures Field" field correctly.


- The first field in the pop up is labeled Choose Ventures Field. This is where you can choose to map the field you are creating to a field that exists in Ventures. You can choose from most custom fields you have added or an existing Ventures field.
- When you click on the dropdown menu you will see a lot of options. Existing Ventures fields are listed first, followed by any custom ones you have created that you can map to with some exceptions (Click HERE to see what objects and custom fields are available in each form). When you push your application to Ventures, the data collected by the field you are creating will be mapped to the field you specify here.
- In our example below, we selected Business Email. This means that any data entered in this field will be mapped to the Primary OC Business Email field in Ventures.

- If there are additional field types, or multiple types, you will have a drop down menu to choose from. For example if we choose a narrative, the field type will open up and if I click on it I can make my selection from a drop down menu.

- If there is no field in Ventures you want to map to and you select None, all the fields in the pop up will be available for you to edit. You can see the field type dropdown lists all the types available. Choose a Field Type that matches your field best. You can see a list of the Field Types available by clicking here.
- If you add a field with the None option selected in the Choose Ventures field, when you push data to Ventures the data will end up in the Notes section since there was no specified field.

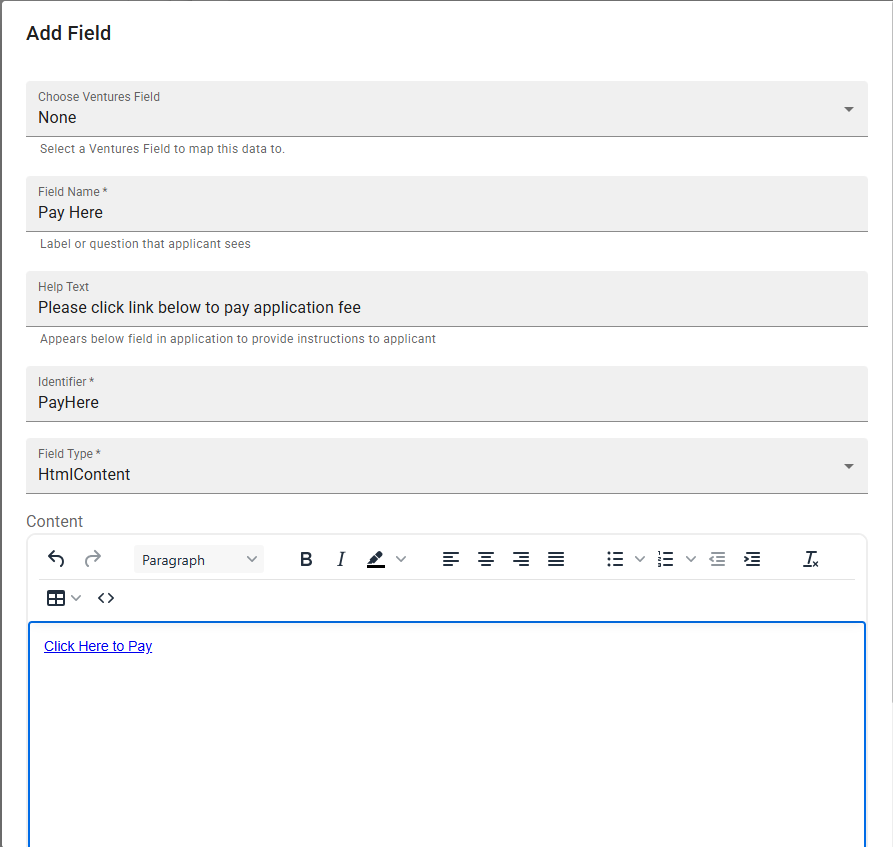
How to add a link to a HTMLContent Field Type
First find the tab within your application where you want to add the link
- Click Add Field
- Add the Field Name, help text, and Identifier as normal
- Select HTMLContent as the Field Type
- Copy the link directly from your browser and paste the link into a Word document (or similar program)
- Add descriptive text for applicants (e.g., "Click here to make your payment")
- Create a hyperlink with the text in Word
- Copy the hyperlinked text and paste it into the appropriate field in your application questions. Click Ok.
- Click SAVE