4573
4573
Q: How do I set up my Organization's Credit Reporting Bureau account identifiers for reporting?
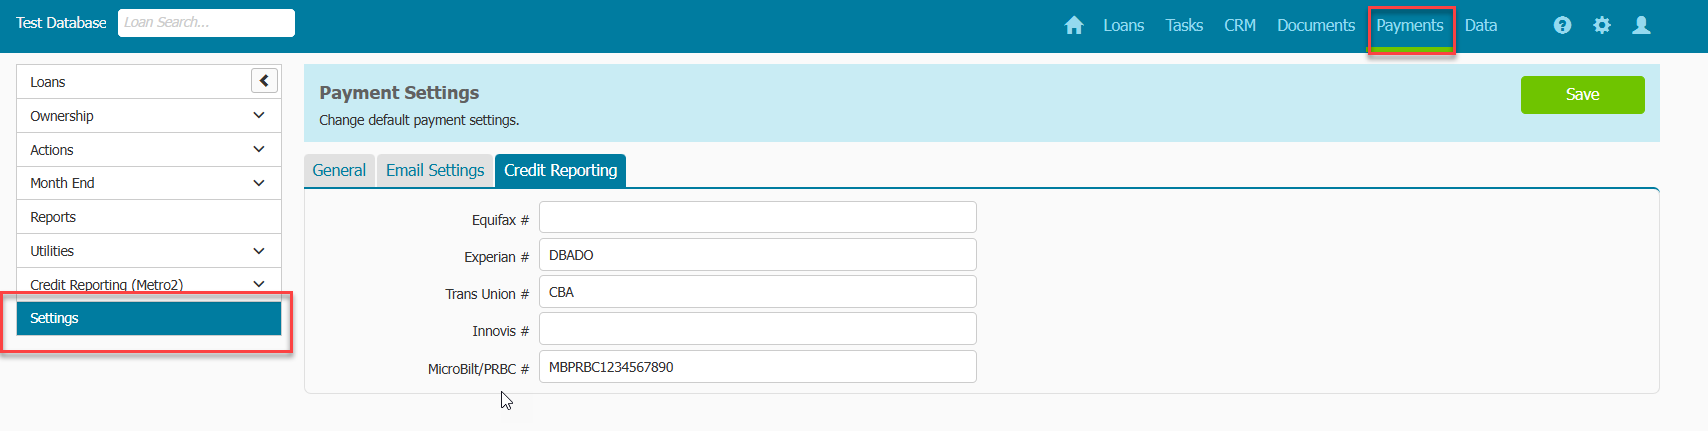
A: Go to Payments main menu > Settings > Credit Reporting tab
- Enter account identifiers.
- Click Save.
Q: How do I manually set up an account for reporting?
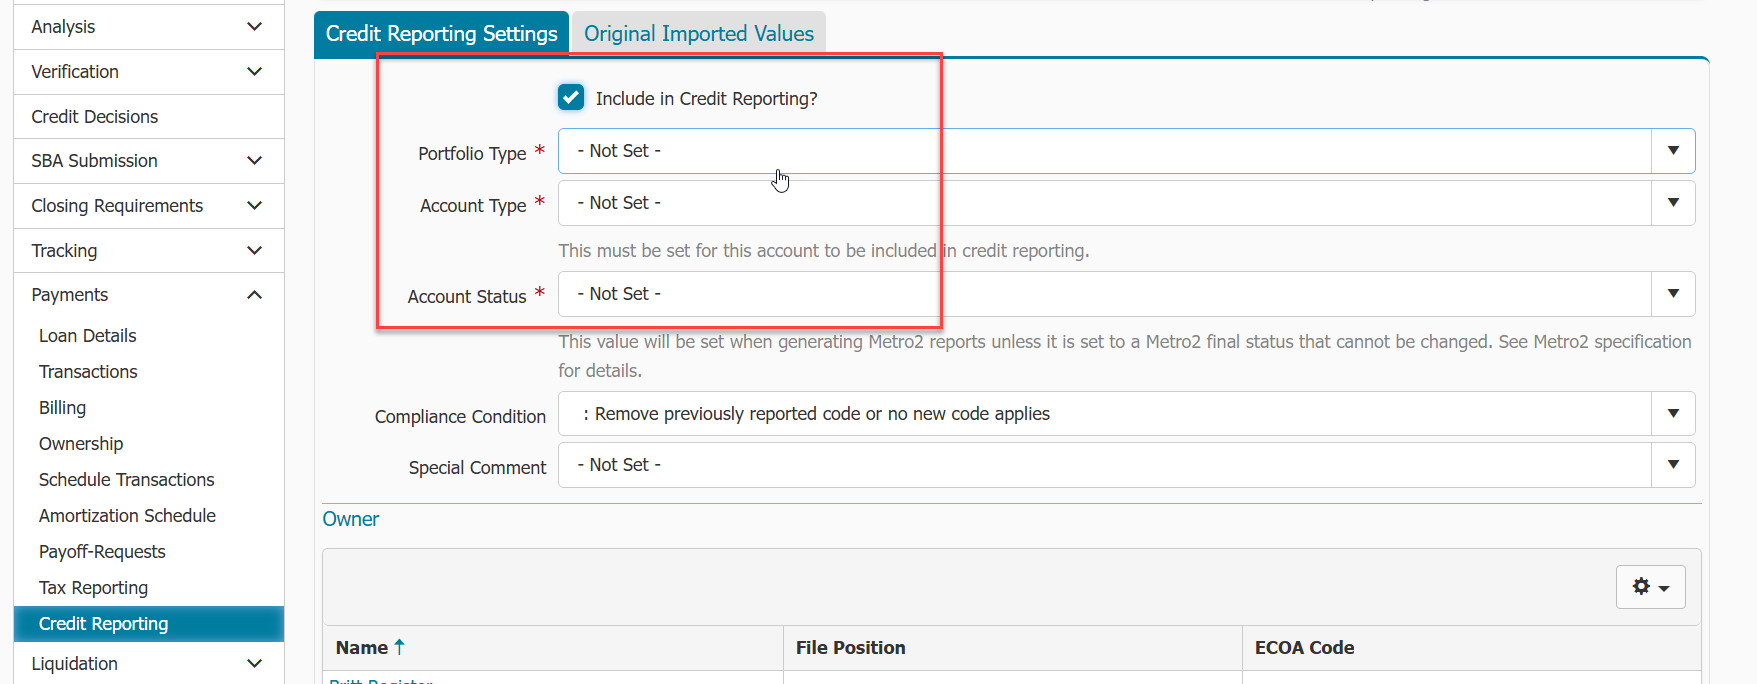
A: Go to Payments menu > Credit Reporting within the loan you would like to set up for credit reporting.
- Check the box to Include in Credit Reporting?
- Fill out the Credit Report Settings tab with the appropriate information regarding payment account.
- Click Save.
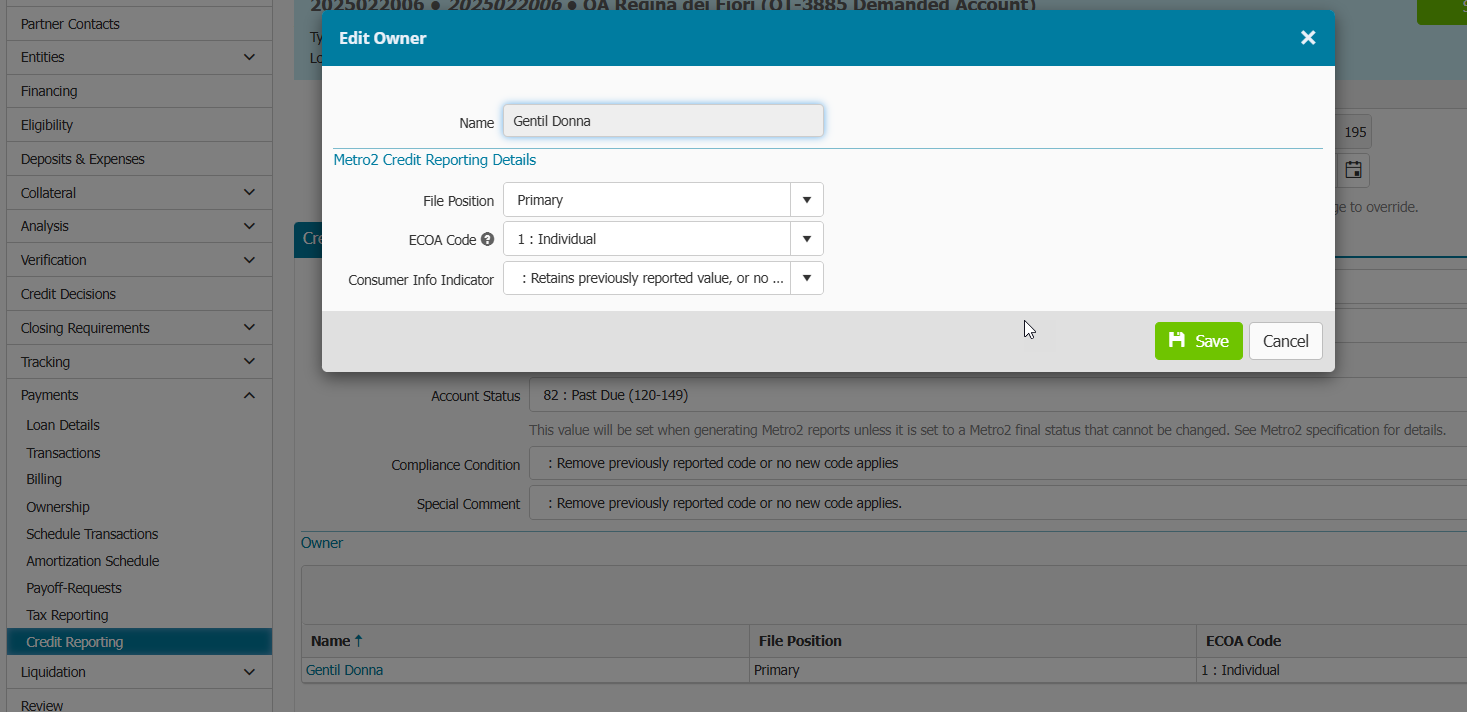
- In the Owners section, all contacts from the Entities menu will be listed. You will add which owners you want to include in credit reporting by clicking on their hyperlinked name. You must have one individual listed with “primary” file position and set with appropriate ECOA Code. If any other owner is eligible to be reported, then they should be marked with "secondary" file position and set with appropriate ECOA Code.
- Click Save.
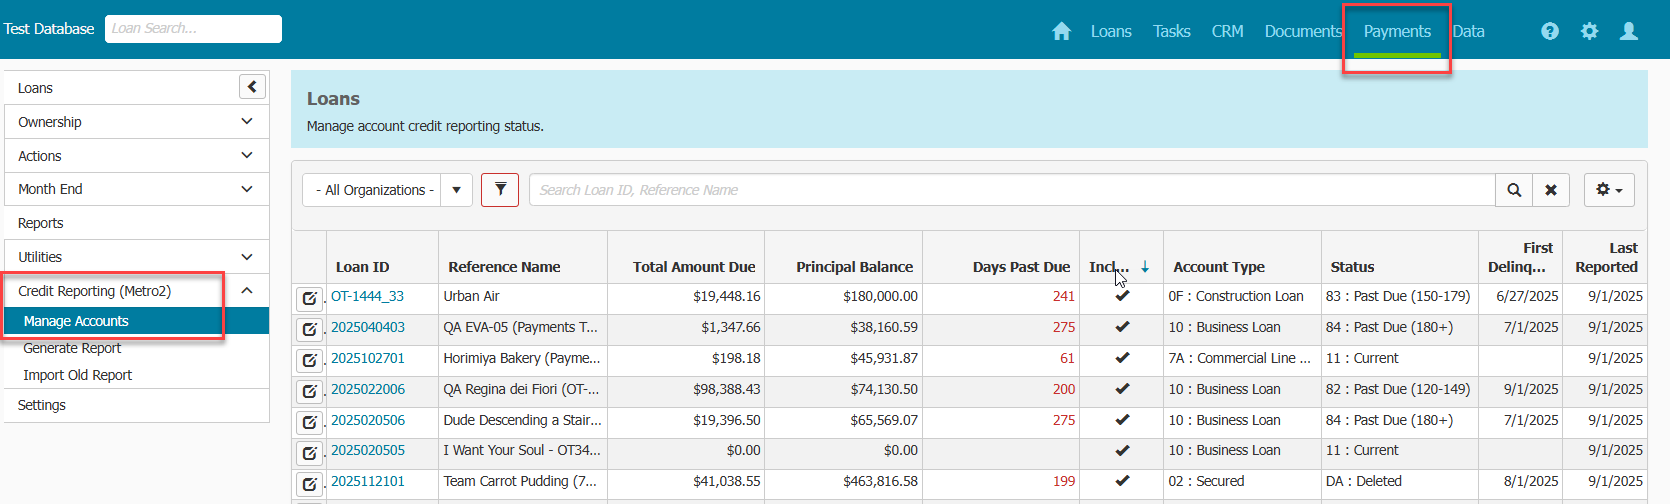
- You will know your account has been added to reporting by going back to Payments Main Menu > Credit Reporting (Metro2) > Manage Accounts menu and seeing the Included column checked off for that payment account.
Q: How do I know which payment accounts have been set up for credit reporting?
A: In the Payments Menu > Credit Reporting (Metro2) > Manage Accounts menu, the grid lists all boarded payment accounts within Payments. There is a column labeled "Included" and if there is a checkmark within this column for the listed payment account, then it will be included in credit reporting.
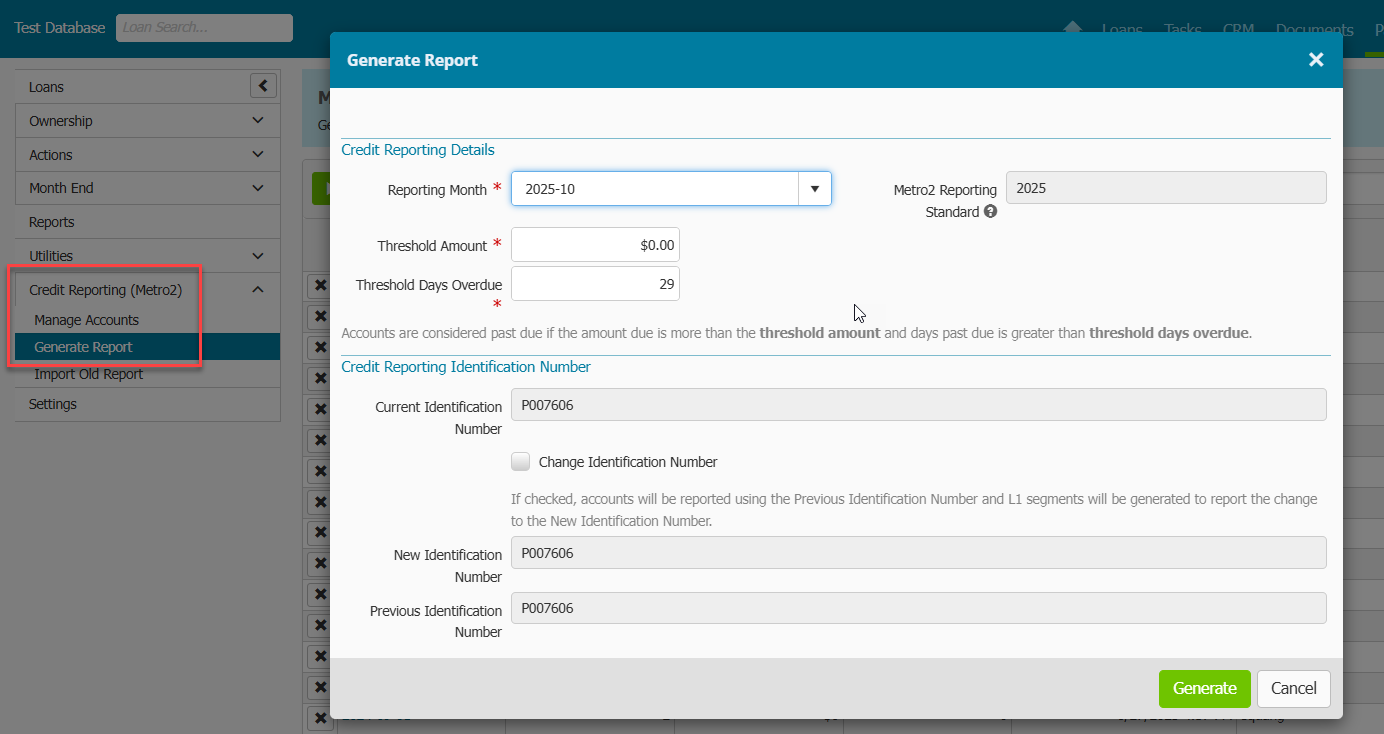
Q: How do I generate a monthly report?
A: You will want to generate the report each month and not skip any months for the report to be accurate. If regenerating a report for a month, delete the same previously generated report first, before regenerating.
- Go to Payments Menu > Credit Reporting (Metro2) > Generate Report menu.
- Click Generate button.
- Select Reporting Month.
- Add Threshold Amount (see help text at bottom of screenshot).
- Add Threshold Days Overdue (see help text at bottom of screenshot). By default, this field will be prepopulated with 29 days which means the report will consider any account 30 days or greater past due.
- Click Generate.
- You will see the created report within the Generate Report grid.
- Export the report by clicking on the hyperlink of the report and clicking Export.
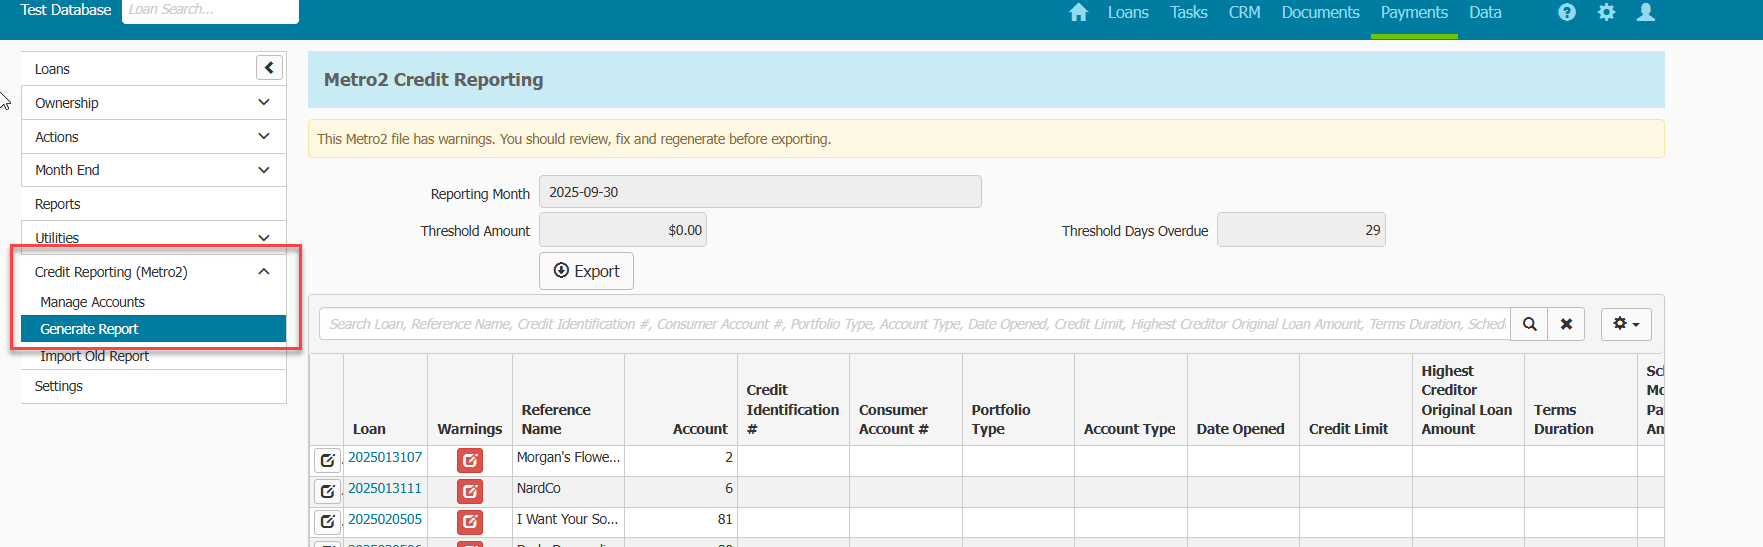
Q: What should I do after generating the report?
A: It is best practice to review the warnings (if any) after report generation.
- In the Payments Menu > Credit Reporting (Metro2) > Generate Report menu, click on the hyperlink of the report.
- Click on the Report Tab.
- Click on the Warnings column to find the any warnings on accounts (you may need to click twice to sort properly).
- Click on the Warnings icon.
- Review possible issues with an account.
- You will need to go to the Payments menu > Credit Reporting menu of any loan to make corrections.
- The next time the report is generated, the changes you made in step 6 will be reflected in the report.
Q: How do I remove an account from reporting?
A: Go to Payments menu > Credit Reporting within the loan you would like to remove from credit reporting (this is different than deleting) and follow these steps:
- Uncheck the box to Include in Credit Reporting?
- Click Save.
- This action will remove the entire payment account from the next generated report and any future reports.
- What will be automatically removed from reporting by the system so no action required by user:
- When an account has been paid off, and you have set and reported the Paid in Full Account Status (Account Status 13, or 61-65) in the monthly credit report of the month they paid off, the account will drop off future reporting months automatically. See Q& A below.
- When an Account Status of DA or DF is set, and you have reported the status in the monthly credit report of the month the entered that status, the account will drop off future reporting months automatically. See Q& A below.

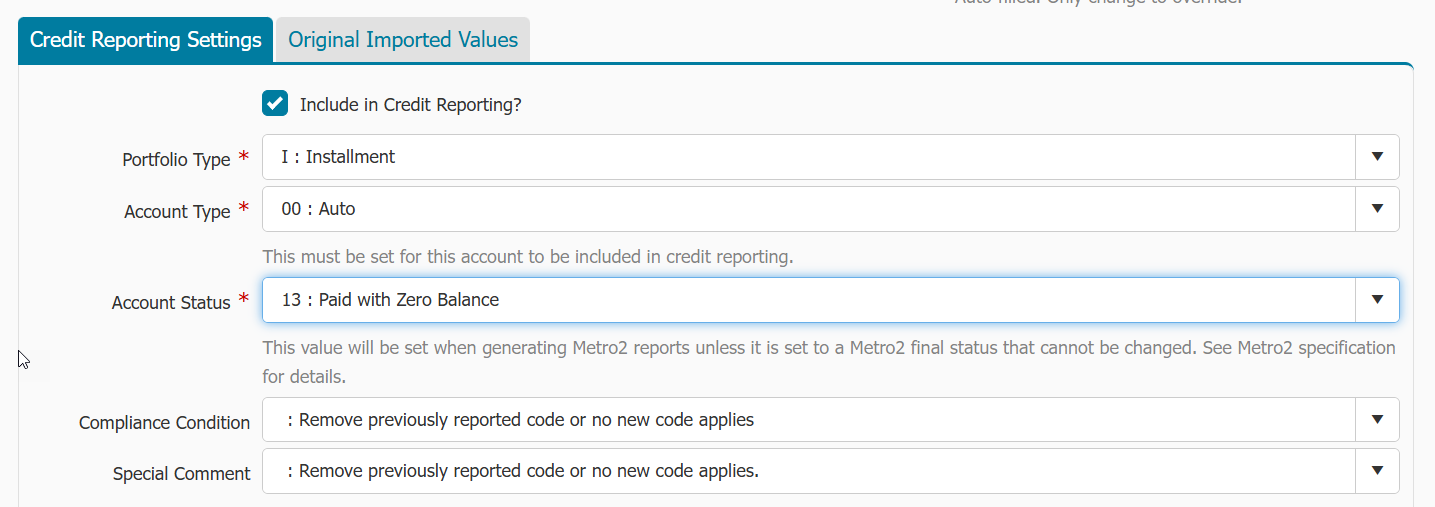
Q: How do I report a Paid in Full status on an account and then remove from reporting?
A: Go to Payments menu > Credit Reporting within the loan you would like to show a Paid in Full status on credit reporting and follow these steps:
- In Credit Reporting Settings tab, change Account Status to Account Status 13, or 61-65 depending on the situation (refer to credit reporting guidelines for more information on when to use these statuses)
- Click Save.
- After generating the monthly report reporting this status, the account will drop off future reporting months automatically.
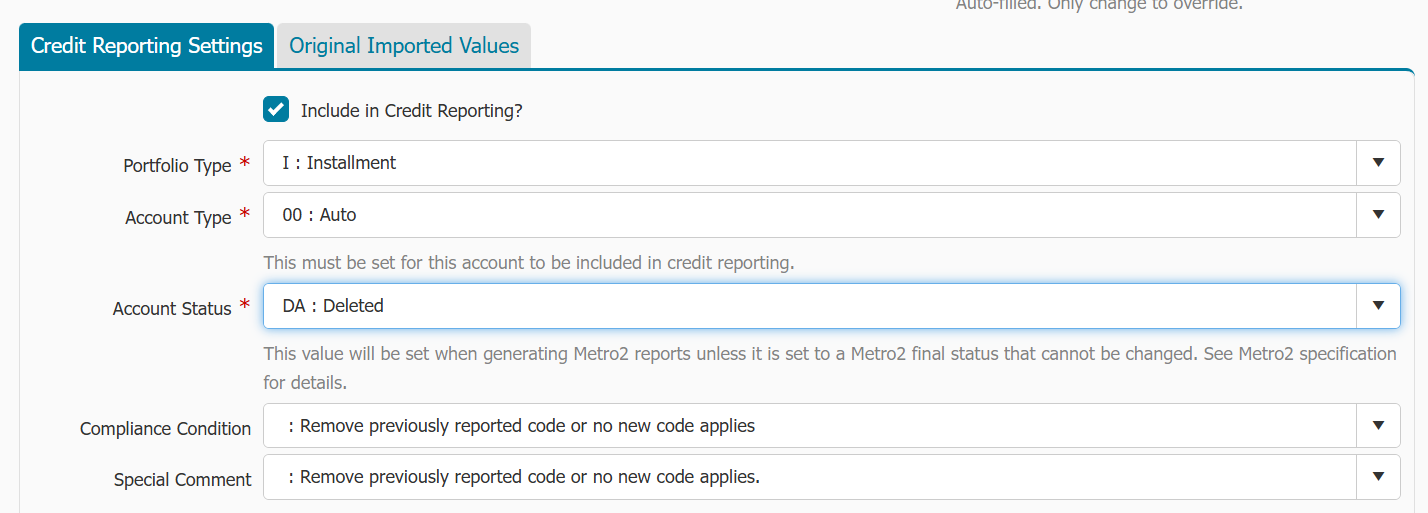
Q: How do I report a delete status on an account and then remove from reporting?
A: Go to Payments menu > Credit Reporting within the loan you would like to show a delete action on credit reporting and follow these steps:
- In Credit Reporting Settings tab, change Account Status to DA or DF depending on the situation (refer to credit reporting guidelines for more information on when to use DA and DF statuses)
- Click Save.
- After generating the monthly report reporting this status, the account will drop off future reporting months automatically.
Q: How do I remove a borrower from reporting?
A: Remember, You must have one individual listed with “primary” file position and set with appropriate ECOA Code when reporting an account to credit bureaus. If you are removing the primary borrower (and not using a delete ECOA code) and setting a secondary borrower as the new primary:
- Go to Payments menu > Credit Reporting within the loan you would like to remove the borrower from credit reporting
- In the Owners section, click on the hyperlinked name of the individual you are removing
- Change their file position to -Not Set-.
- Click Save.
- Click on the hyperlinked name of the individual you are changing from secondary file position to primary.
- Change their file position to Primary and set the appropriate ECOA code, if needed.
- Click Save.
- The next generated report will reflect the changes made.
A: If you are removing the primary borrower using a delete ECOA code and setting a secondary borrower as the new primary:
- Go to Payments menu > Credit Reporting within the loan you would like to delete the borrower from credit reporting.
- In the Owners section, click on the hyperlinked name of the individual you would like to delete.
- Set appropriate ECOA code (T, X, or Z).
- Click Save.
- After generating the monthly report reporting these codes, the borrower will drop off any future reports automatically.
- Go to Payments menu > Credit Reporting within the loan you would like to set the new primary borrower for credit reporting.
- In the Owners section, click on the hyperlinked name of the individual you would like to set as primary.
- Change their file position to Primary and set the appropriate ECOA code, if needed.
- Click Save.
- The next generated report will reflect the changes made.
- If you set a different ECOA code and save for the previous primary borrower after generating the report, any future generated report will re-report the borrower with the new code you set.
A: If you are removing the primary borrower and you have no other borrowers eligible to be reported:
- You will want to either set the appropriate ECOA code or Account Status code, depending on the situation.
- Generate the report for the month you a removing the borrower/account.
- If ECOA code T, X, or Z was reported and report generated, the account will drop off any future reports automatically.
- After generating the monthly report reporting this status, you will want to remove the account from future credit reporting. Follow the steps listed in previous Q/A - Q: How do I remove an account from reporting?